


mimas
Mimas is the graphical interface for rubyk and any oscit (open sound control it) enabled devices. The source code for the application is released under the MIT license but the application as a whole is GPL (GNU General Public License) since we are using the excellent juce framework.
The application will run on Mac OS X, Windows and Linux but currently only compiles on Mac OS X.
downloads
We have not released any version of mimas yet.
Source code
The source code can be retrieved with git on github.com/rubyk/oscit.
Bug tracking
If anything seems wrong with this library, please open a ticket (if this seems too much, sent an email to the mailing-list).
mimas name ?

The name comes from the smallest natural satellite in the solar system that is spherical (looks like a moon).
Mimas has a big crater which makes it look like some sort of giant eye, and that’s what the graphical interface is about: “see and master it all”.
latest blog entries
-
Sync between editor and process
Mimas editor
This is the first tangible result concerning the graphical interface after the switch to Lua and Qt. The development in the new environment is a joy and things advance at a fast pace.
In this new context, writing tests by mocking parts of the system is really easy with Lua and greatly simplifies test driven development (especially for graphical elements). Difficult conceptual issues such as the relation between model and views remain but testing/fixing is just “command+R” away.
lk.Process sync
We have managed to make sync between
lk.Processandeditor.Processwork. This implies many tools working together such as mdns (Zeroconf network discovery), zmq (zmq networking library), msgpack (binary serialization), mimas (Qt bindings), yaml (text serialization) and editor (Mimas application objects).In the example below, the process has been automatically discovered on the network, patch information fetched and the process is drawn in the
editor.ProcessView.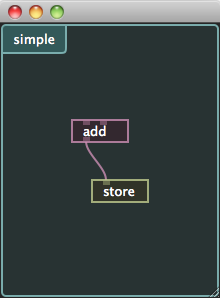
Patch creation
Another big advance highlighted by this example is that patch definition works (with automatic loading of required lua code). Here is the “simple.yml” file with external “add” and “store” classes. We could have serialized these in the patch by using “script” instead of “class”.
add:
  class: add
  hue: 0.9
  x: 70
  y: 95
  links:
    sum: store/in/value
  params:
    val1: 0
    val2: 5

store:
  class: store
  hue: 0.2
  bug: 0.7
  x: 90
  y: 155
The “add.lua” file contains this:
inlet('val1', 'First value [number].')
inlet('val2', 'Second value [number].')
sum = outlet('sum', 'Sends sum of first and second values [number].')

val1 = val1 or 0
val2 = val2 or 0

function inlet.val1(v)
  val1 = v
  sum(val1 + val2)
end

function inlet.val2(v)
  val2 = v
  sum(val1 + val2)
end
The “store.lua” file is like this:
inlet('value', 'Stores the value')

function inlet.value(v)
  value = v
end
2011-03-31 - tagged: - comments (0) -
Going for Qt
You have probably read the post on the lua rewrite (Going for a Lua(jit) rewrite). Since everything is going to change, I took the opportunity to see if there was a framework out there that would be easier to use with Mimas.
What I need is an open source portable GUI framework that has scripting support so that remote devices can “publish” there interfaces with the scripting language.
I want the flexibility of html+css+js with a C++ backend (hard to meet needs) but I found the perfect framework.
The framework is Qt because:
- it is LGPL
- it works on mac/linux/windows
- it’s a great C++ framework with solid support for signals and slots (easy to connect widgets to proxy)
- and finally, it has QML, a Javascript variant that can be used to create interpreted user interfaces.
<edit> After some work on the new lua based Rubyk, I realize that I do not want to use too many languages to define interfaces and such, so I’ll probably use Lua for this too. It has the added advantage to make the interface code easily portable to other frameworks or devices (iPad with Wax for example). </edit>
Learning Qt
I started learning the framework and I am very impressed by the overall quality. The documentation is good, the examples are easy to understand, the template/macro usage is well worked out (I know it’s hard to keep this simple).
Things just work like you expect, with some nice surprises related to layout (scaling with windows and such).
GUI redesign
Now that the tools are in place, I need to redesign how all of this gets connected together. The “things” involved in this game are:
- planet: process executing Rubyk (Lua)
- satellite: graphical interface (Qt)
- patch: stores a processing definition with parameters (Lua)
- prototype: stores a prototype for a processing node (Lua)
- view: a view contains widget organization and behavior to control a planet from a satellite (QML).
Rubyk files
prototype file
A prototype file contains Lua code to define a “class”. The file contains method definitions, class variables and default values.
Example:
node:outlet('output')

node:inlet('input').call = function(self, val)
  if val then
    print(string.format("[%s] %s <--- '%s'", self.name, 'input', val))
    -- receiving value
    self.val = val
    -- can we notify without explicitly adding this line ?
    self:notify('input', val)
    -- prepend name and send to outlet
    self:send('output', self.name .. ': ' .. val)
  end
  return self.val
end

-- other way to declare the same (without the send)
node:inlet('input2')
Note that all data needs to be stored in “self” since the file definition is shared among all instances of this “class”. Any global variable is shared with all instances.
patch file (processing definition/settings)
A patch contains code to instanciate prototypes, setup links and change parameters.
Example:
rk.set('a', {class='proto.lua', name='A'})
rk.set('b', {class='proto.lua', name='B'})
-- links
rk.connect('a', 'output', 'b', 'input')
Note that the “set” operation updates a node if it exists or creates a new node if the given name does not exist. With some tricks in the
_Genvironment table, a setup file can be used without changes as a new prototype (this enables sub-patch abstraction).reload
When running a patch or prototype file, we need to “update” existing objects instead of recreating them so that links and state are preserved. Adding new objects or updating existing ones is easy, but how do we delete links/objects/methods ?
A solution could be to mark these elements as dirty before the script reload and remove them if they are still dirty (not touched) after script execution. In order to do this, we could use a new environment table on each reload and simply move objects from the old table to the new one on “create/update”. What is left in the old table should be deleted.
But how do we delete a node in Lua ? Since Lua uses garbage collection, we need to remove all references to the node. This means removing:
- links pointing to the node
- references in env tables (parent node, prototype)
And how do we update sub-patch links (sub-patch definitions do not have this problem since they are “live” through the metatable) ? For now, we consider that these elements are not updatable.
runtime Lua
prototype
In a script, the ‘node’ is a prototype created by Node.new. The prototype stores methods
and outlet/inlet definitions. The script is run in its own private environment. This means
that it is possible to create private methods but all state information should live inside
‘self’ or it will be shared across objects.instance
An instance is made of an empty table with the prototype as metamethod. The instance also
contains an empty ‘outlets’ list with a special index method to create outlets as needed. In
order to create an outlet, the list searches the prototype’s outlet definitions.2010-12-10 - tagged: - comments (0) -
OpenCV + OpenGL control
This is a short post to announce that I have rewritten all the core management of types and attributes (see this post: patch vs view). This was a pretty big change but we now have an “attributes” field in every object in which we can store about anything that we need.
Since I had to fix many tests, I also decided to fix the control of rubyk systems running OpenGL.
As some of you may know, OpenGL is an API that is Thread-contextual. This means you have one global OpenGL context per thread. When you call
gl.Color(0.5,0.5,0.0,0.5), you are changing the current thread’s OpenGL context.Because of this, and since Rubyk is massively multithreaded oriented, I had a couple of problems updating and getting parameters from GLLua scripts.
I am happy to tell you that this has been fixed and that I could control OpenCV blur and cube rotation from Mimas !
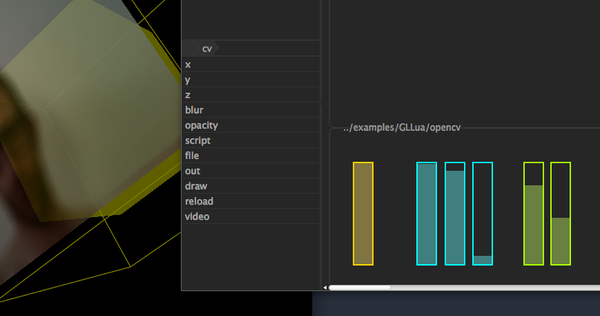
Changing live video effect from Mimas.
The sliders do not have labels yet. These are:
- /win/open_close (open or close window)
- /cv/x (x rotation angle)
- /cv/y (y rotation angle)
- /cv/z (z rotation angle)
- /cv/opacity (live video opacity)
- /cv/blur (live video cv.blur size)
You can run this example from your rubyk’s build directory:
cd build
cp ../examples/GLLua/opencv.json ./
./rubyk ../examples/GLLua/opencv.rk
2010-07-10 - tagged: - comments (0) -
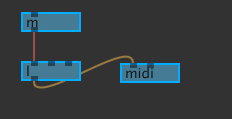
Link creation !
Rubyk and Mimas now work together to enable drag and drop creation of links:
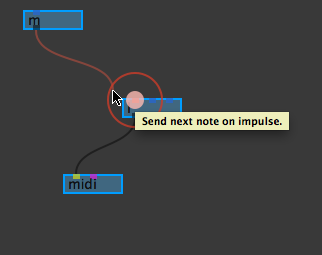
link drop target with tooltip
2010-06-30 - tagged: - comments (1) -
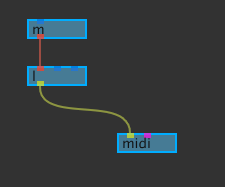
Links shown !
I’ve been waiting for 2 years to see something that would look like a signal processing tool… And finally, here it is: links in the patch view.
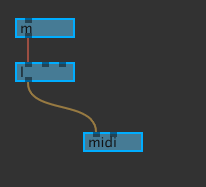
links in the patch view
As you can see in the image below, the link shape adapts when the outlet is lower then the inlet. This makes the links easier to see in this case.
links upside down
testing with Slot colors
I think it’s ugly, will only show slot colors when connecting.
testing with slot colors
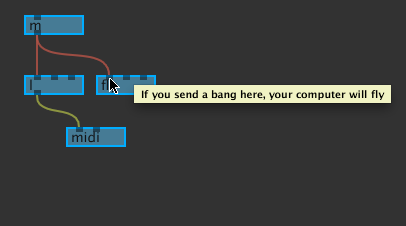
Slot tooltip
I’ve just added tooltip support. When you declare a method in Lua like this (or in C++ with equivalent code):
function fly(val)
  -- make laptop fly
  return true
end
inlet("fly", BangIO("If you send a bang here, your computer will fly"))
You get some nice tooltip for the inlet:
 2010-06-24 - tagged: - comments (0)
 -
Showing inlets and outlets
Just a quick note to say that Mimas now draws inlets and outlets !
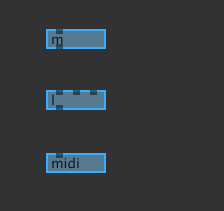
Slots display but links aren’t drawn yet.
2010-06-22 - tagged: - comments (0) -
Started implementation of 'patch' view
Things are moving quite fast because I want to start using old rubyk through mimas. I have spent some time trying to decipher how to make the patch appear as a view so that the same patterns can be used to create, remove or update elements in views or in the patch.
patch vs view
In case you wonder, the patch is the thing that represents the processing logic inside the server whereas the views just show controls to alter parameters inside this processing logic.
patch
In order to make the patch work, I implemented “to_hash” in oscit. This will also be used to save and restore patches.
I had some trouble understanding what to do view view-only information (like color, position) that is stored in the Node:
- expose everything with methods ?
- or keep this things hidden and use the controller to expose them in the patch view ?
After lots of hesitation, I decided to not clutter the method namespace with view elements and keep these two worlds separate. So now, if you dump a patch as Json, you will get something like this:
{
  "@view":{
    "widget":"Node",
    "x":0, "y":0, "width":60, "height":20, "hue":203
  },
  "@class":"/class/Metro",
  "out":{
    "bang":{"/v/value":{}}
  },
  "tempo":115
}
This example will probably change, but the main ideas are there: all information regarding view are stored in ’@view’. The “widget” attribute is used by the view to display the proper type of widget and the ”@class” attribute is used on object creation.
“out” lists the slots with outgoing links and all the other attributes are just serialization of the methods declared in the node/script.
first patch view (no links inlets or outlets yet)
2010-06-20 - tagged: - comments (0) -
drag & drop new widgets
You can now add widgets by dragging paths from the browser.
When you drag a path (“tempo” here) on a device view, the widget steals the color and shape of the closest widget (the new dragged element is the lime full rectangle) and snaps to to ease alignment.
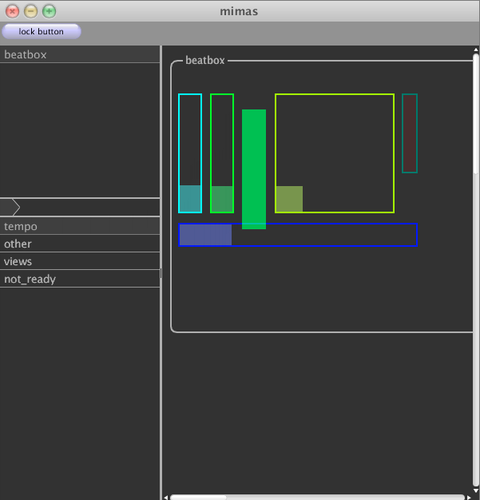
Example of a path drop to create new widgets.
2010-01-09 - tagged: - comments (0)
@lubyk_
Loading latest twitter data...
Highlights
-

received funding for interface
Funding from the Swiss Federal Office of Culture to write the graphical frontend to rubyk !
-

Switched to mono-threading
Moving from a global mutex to a global select/poll loop.